Attempting to revive a PlayStation 3

Posted by pulkomandy on Mon Jan 1 11:25:33 2024  •  Comments (0)  • 

Many years ago, my cousin had a problem with his PS3. Apparently, the blueray drive stopped working. He disassembled it to see if he could fix it, but he couldn't. Then he asked me if I could take a look.

At the time, I thought that I could look into hacking it to allow playing games from the hard disk only. Surely that would be good enough. But, it was still the early days of PS3 hacking, at the time, the exploits needed a special USB device, which I didn't have. So, the console ended up sitting on a shelf in my paren'ts flat, and nothing happened.

Recently I decided to take a look at it again. So I took the console home with me and started investigating. I don't know what happened to this poor blueray drive when my cousin attempted fixing it, but it seems completely dead now. I didn't even manage to insert a disk in it. A brief research showed me two good news, however: hacking PS3s is now much easier, and there is also a special "noBD" firmware for people in this situation, because the console normally won't launch any game without a Blueray drive.

So, I got the noBD firmware and installed it. I did this a while ago, so I don't remember all the details, but it was straightforward, especially as this PS3 was running a very old firmware which is easy to hack. I am now running Evilnat's firmware (CEX, noBD). I also installed WebMAN which is the tool for running games from disk images on USB or hard disk.

Then the problems started. I wanted to install some PS1 games. One nice feature of the PS3 (at least the early models) is the backwards compatibility with the older consoles. Surely I could put some fun games there and play with friends? Well, it turns out, not really. The problem is, the console really wants to communicate with a blueray drive to start games that are meant to run from a CD. And for the PS1 games, there doens't seem to be any workaround for that.

Then I thought, OK, the BlueRay drive is mechanically dead, but I don't need it to actually read any discs. It just needs to be there. In reality, just the control board has to be there. So, I got the drive back (initially I had left it in my parent's flat) and I reconnected it insode the console. And I tried to install a normal firmware with Blueray enabled.

Well, this didn't work. The firmware cannot communicate with the blueray and this results in an installation error. Then the console reboots and tries again. And again. And again. And you can't exit that update loop, as there isn't even a way to access the service menu/failsafe mode in that state.

How do you get out of this? Well, the firmware is on the hard disk during installation. So, you remove and reformat the hard disk (I took the opportunity to replace it with a larger one). You don't need a specific format for the disk, just remove what's on it. The PS3 will reformat it. Then, prepare an USB key with a firmware update (a noBD one). Install the new HDD and hold the power button until the 3rd beep. Then release it and hold it again, again until the 3rd beep (this time it will be a double beep). You get to the service menu and from there you can install the noBD firmware again.

I still don't have a solution for installing PS1 games. I might try PS2 and PS3 ones. At least games in PKG format should work, so I can explore some of the interesting things that were sold on the PSN store, I guess. And also there are emulators for some older consoles.

But, in the end, the experience of a console with noisy fans is not that great. Should I bother with this? I don't know, maybe I will install a random set of games and put it in the break room at work, and we can have fun playing it during breaks with my colleagues. Do you have any games suggestions?

Updating the BIOS on my Fujitsu laptop

Posted by pulkomandy on Wed Aug 30 18:32:07 2023  •  Comments (0)  • 

Long-winded and irrelevant introduction, like they do on cooking websites before you get to the recipe

I am the happy owner of a Fujitsu U7311 laptop. After several years of using used thinkpads, and not being happy with the new models designed by Lenovo, I had to switch to a new machine after my Thinkpad started developing some unexplained crashes, I suspect some kind of memory corruption.

I found that Fujitsu, not the most popular manufacturer, is actually still doing great machines. In fact, it was acquired by Lenovo a few years ago and it seems they took on the old Thinkpad spirit, or at least the parts that made it work for me.

Unfotunately, there is no equivalent of the thinkwiki for Fujitsu machines. This is pretty much the only downside. The customer support from Fujitsu is better than usual, with complete disassembly guides available from the support page (translated in several languages, and very well made with detailed pictures). There is also a support forum for specific questions (OK, maybe don't get TOO specific or you won't get an useful answer).

On the hardware side, I am happy with having basic IO (VGA (but the next generation U7312 removed that, oh well, I guess I could always use an adapter from HDMI or DVI?) and Ethernet ports) and I also got a docking station while I was at it (a proper one using a full docking connector under the machine, not one of these USB3 ones that I have no idea how they work). The magnesium chassis and case ensures I won't have bits of broken plastic everywhere after a few years. I also have a keyboard with a trackpoint (but you have to make a choice between that and a spill-resistant one, and I had to buy the keyboard separately and install it myself).

It is also interesting how the 13, 14 and 15 inch versions are largely identical, to the point that the BIOS image is the same for all 3. And the model numbering is also easy to follow, with one digit being the display size and the next two being the Intel CPU generation. So you easily know what you get, just from the model numbers.

Anyway, the BIOS update

The machine ships with an Insyde H2O BIOS, that is nothing unusual compared to other systems. I had two problems with the initial version shipped with the machine: boot was very slow (it took 10 seconds or so before even initializing the display), and it was not possible to switch between different displays after booting (the only way to use an external display for the BIOS was to boot with the lid closed, and then you can't use the keyboard).

The BIOS update is available from Fujitsu Support website and comes either as a "desk flash instant" or a "bios admin pack" version, but both of these contain Windows executables that won't run on my Haiku system. But it turns out that's not really a problem. The BIOS admin pack contains a file with a .bup file extension (I guess for "BIOS update package"). This can be extracted to the EFI system partition and it contains the executable that will perform the update.

So, extract the thing, copy it to the EFI partition and reboot to an EFI shell. From there, run the FJNB2E7.CAP file and let it run for a while (it takes a minute or so, be sure your battery is loaded and you are on mains power to avoid any chances of power loss during the update).

The first time I ran the executable, it did not flash anything, possibly because I had tried to run other things from the archive before (there's another executable but I'm not sure what it's for, and running it only resulted in an error message).

Anyway, run the thing, and when it's done, type "reset" to exit the EFI shell. That's it, your BIOS is updated! You can now remove the files from the EFI partition.

By the way, obviously do NOT try to install the BIOS from another machines or use tools from another manufacturer. This procedure worked for me but I take no responsibility if you break your machine, recovering from an erased BIOS is either very hard or impossible (I don't know which and I don't want to try).

Keeping Contiki 1.x alive

Posted by pulkomandy on Wed Aug 30 18:31:29 2023  •  Comments (1)  • 

Contiki is a small operating system originally developed by Adam Dunkels. Version 1.x became famous on the internets after he ported it to the Commodore 64. The system came with a small GUI and ran reasonably well. It is written in C and uses a few nice tricks to run efficiently on low memory systems.

Contiki became "big and professional", well, mostly profesionnal, and in version 2.x, the GUI was mostly removed and the fun 8 and 16 bit machine ports all abandoned. Now it is useful for actual projects, running on small sensor boards and the like.

The best place to find info about the old Contiki version is the Hitmen demogroup page. I was a bit annoyed about the Amstrad CPC port description there: "runs slowly, does not look nice, and could probably be improved. But still worth a look". Certainly the CPC deserves better. And so I started hacking. That was in 2014.

The CPC port was initially developped by Kevin Thacker, who got it running, and kind of stopped there. It was indeed very slow, but the main cause was the implementation of the "clear rectangle" function as a loop putting space characters all over the display. But I went on and changed quite a few things to get it to look better, be faster, and saved several kilobytes of RAM (partially thanks to improvements in SDCC, and partially through rewriting more of the UI code with small assembler parts, adding missing "const" in various places, etc).

I also simplified the build quite a bit, in particular I had to rework the generation of symbol definition files that are used to link the loadable PRG files to the Contiki kernel. On the CPC port, these files are generated from the SDCC generated mapping files, now using some SED scripts to convert them to the appropriate format. I also made several adjustments to use newer SDCC versions over the years.

Later on, I also ported Contiki to the Bitbox console as well as the VTech V.Smile. The V.Smile port is still unfinished and waiting for the development of a proper toolchain for its unusual CPU, more on that later in another article.

Anyway, this brings us to today where I finally decided to update the port to use the latest version of SDCC. The SDCC compiler changed their calling convention in version 4.2 and finally added a way to pass parameters to functions using CPU registers. Before that, they were pushing parameters to the stack, and making that more complicated by insisting on pusing only 1 byte, when there are no instructions on the z80 to do so (PUSH and POP always work on 16 bit register pairs).

This, of course, requires all functions written in assemby to be updated. But before I got to that, I had to fix a patch to SDCC. One specificity of Contiki is its ability to load programs at arbitrary addresses in RAM to execute them. On a modern machine, this would be handled either by using the MMU to provide a fixed memory layout to the program, or by compiling the code as "position independent". But none of these are available on the Z80 CPU (well, you could, with a lot of custom hardware, but not on an Amstrad CPC at least). So, Contiki has to "relocate" executable, that means, after loading them into RAM, patch every address referenced in the code to adjust it for where the program was loaded. Fortunately there is some support for this in SDCC and Kevin provided a patch to generate a relocation table that lists the places that need to be patched in the final binary of each program.

I have kept this patch up to date with the current version of SDCC over the years, and version 4.2 needed a new change. It internally represents addresses as 24 bit instead of 16, I guess to allow support for banking. This resulted in corruption in the generated .hex files, and a bit of confusion until I managed to convince SDCC buildsystem to generate binaries with debug info for the linker, so I could look at what it was doing. It took a bit more guessing due to Haiku debugger not showing the value for global variables yet, but eventually I figured it out.

The next step was fixing a segmentation fault in the compiler. Fortunately, I could locate an existing bugreport with a fix, and apply the changes to my version of SDCC to avoid the problem.

And finally I could get to the part where I have to adjust all the assembler code to the new convention. Several of the functions could be simplified or even removed completely (when the calling convention matches that of the CPC firmware, it's possible to call directly into the firmware).

Converting the functions was not too hard, despite me making some stupid mistakes (don't pop something into a register if you need the value that's already in that register...) and having to fix another place where a function corrupted the IX register while SDCC didn't expect that (since it's the frame pointer, it assumes all functions preserve it, including ones written manually in assembler).

In the end, Contiki is now running fine with SDCC 4.2! I then tried to turn the optimization level (max-allocs-per-node) way up to 20 million and let things compile for a very long time. But this failed, the compiler generates instructions that the assembler doesn't accept because they are undocumented opcodes (that exist in the z80 implementation, but were not mentionned in the official documentation and removed from later CPUs like the z180).

So for now I have turned that back down, and I will test again in SDCC 4.3 where support for undocumented opcodes will be official and toggleable with a command line switch.

In the end, this new version of SDCC allowed to raise the free space in RAM with Contiki running from 24 to 26K, which is not bad at all! And there would be ways to free even more, by moving the Contiki Kernel to a ROM or using the RAM banks of the CPC to not have the code and the framebuffer share the same 64K space.

... so a few days later I did just this. It took some bug hunting and some not so clean tricks to get the file generated the way I wanted, but Contiki is now a ROM. Which means the free space is now 37K out of a 41K "heap", when the desktop and the "memstat" apps are both running. This is possible because the ROM uses the same memory space as the framebuffer, and so, suddenly there is 16K more of address space to use.

I think I could also implement a proper GUI driver that is not restricted to simulating a GUI from textmode. It could be made to look quite a bit nicer with a smaller font, and not being restricted to 8x8 pixels character blocks with only 2 colors for everything, and also make it use an overscan display instead of just 320x200. That would require moving the apps to memory bank so most of the main memory can be used for the display. But I already planned that when I started working on Contiki 10 years ago, and I have not started it since. And I think it's time to move on to other projects.

I still had two bugs to fix: during startup, there were some things written to the framebuffer that shouln't be there, meaning the linker somehow put non-const data in the ROM. And, the icons on the desktop are not loading. These two were related, it tuns out I had added a "const" to the icons to workaround a problem with the generation of the DSC files (these are files with just the icon data, used to quickly show the icon directory in Contiki). And so they were in the ROM, but adding an icon to the desktop actually writes some things in the icon data structure... So I made my hack a bit more complicated and now it's working fine.

While investigating this, I also found that the borders for some windows did not stop drawing where they should, and continued all the way to the bottom of the screen. I'm not sure if it was a compiler bug or a mistake in the code, but I have rewritten the code in a slightly different way and it's working fine now.

So, it is time for a new release of Contiki after 5 years of doing nothing, and two weekends of hacking!

Download Contiki 1.4 for Amstrad CPC. You will need to flash the ROM to any ROM slot, and put the DSK in your disk drive. Then type |CONTIKI to start the OS. Enjoy!

Get the sourcecode using Git if you'd like to help with this project or have your own fun experiments with it. I don't know when I will look again into it!

I have also submitted the patches for Haiku support to the SDCC team, and we are discussing which of the changes are useful to merge on their side. Kevin's relocation patch has a known bug, that will need to be fixed before they accept it upstream. Unfortunately, fixing it requires some changes to the way the relocation info is encoded. I'll see what I can do about it.

I also found bugs in the ACE CPC emulator (setting the PC register from the Z80 editor window actually sets IX instead?). So that's another bug fixed in ACE and I should look into that as one of my next projects. I want to do a point release of it with a collection of bugfixes, and port and publish all the ACEpansions that are available for the MorphOS version now. Oh well, the TODO list never really goes down!

Forgotten console: Giochi Prewiosi My Life

Posted by pulkomandy on Sun Mar 20 11:10:36 2022  •  Comments (0)  • 

A few months ago, while visiting a surplus store in my area, I noticed this thing that looked like a game cartridge caled "Disney My Life Hannah Montana". Looking on the back I saw it was for the "My Life" console (sold separately). I had never heard of that console. So I left the thing there, went back home and did some research.

I did not find a lot. The console was released in 2007 and there was a later version called My Real Life. It was sold at least in Italy, France, and the US. It is strongly marketed "for girls", with pink cases, heart-shaped buttons, etc. It's fine (no, really, it's not, why would anyone do that?). I'm not a girl, but I love pink.

There are several cartridges and expansions for it. But no one has written an emulator or even published a teardown. And despite initially selling relatively well, it was not that easy to find a console for an acceptable price.

Yesterday I visited that store again. The poor cartridges were still there gathering dust. So I decided to buy one this time.

The packaging is surprisingly nice. The thing is sealed in (relatively thick) plastic wrap, with extrusions for two cardboard pieces that stand out, a bubble for the cartridge (both the cartridge and cardboard are held with extra pieces of plastic), and an extrusion on the back so that the whole thing can be put vertical on a shelve. There is also a full color, 35 page manual (all in French, while the outside packaging is bilingual French and Italian).

The cartridge contains an exention to the "My Life" game built into the console. I could not try it yet, but from the screenshots in the manual and on the packaging this appears to be isometric pixel art (somehwat similar to Habbo hotel), you play a character and have to buy clothese, meet boys, go to toilets regularly to keep your hygiene bar up, go to school, take care of your pet, etc. With the Hannah Montana cartridge, you can go to the airport and visit Malibu to attend to Hannah's show. So your goal there is to find tickets for the show, and maybe manage to meet the star backstage. How exciting!

The cartridge itself has a connector for another extension with extra items to collect in-game. Clearly they were trying to get parents to buy more and more things... The extension is shaped like a small guitar, because why not?

I opened the cartridge to see what's inside. There is a serial EEPROM and a blob, which is probably some kind of parralel ROM or nor-flash. I have not tried to match the pinout with existing flash/ROM chips yet. I don't even know if it is 8 or 16 or 32bits and what size it is. I figured out I would know more about it if I had the console. And also I'd like to try the game before I do anything destructive to it (hopefully I don't need to).

So I went hunting on the internet. The usual websites were offering it for higher-than-new prices, which I didn't really want to pay for this thing. So I did the most crazy thing and went to page 2 of Google search results. In fact I went down to page 4, and there found a link to someone selling it for a very acceptable 5€ on archine.com. I had never heard about that website, and indeed it seems not very popular. The website lists less than 160 items for sale, from about 6 different sellers. Anyway, I placed an order, hoping it was not a scam website (who would attempt to scam people looking for that console, anway?). A few minutes later I got an email from the seller. She said that I should have contacted her because she could have sold me the items through Kiabi Seconde Main, another website I had never heard of that initially specializes on second-hand clothes, but expanded to children toys as well (not the first time such a thing happens, in fact I managed to buy some VTech gear for low prices from Vinted, where collectors don't really look for it (who am I kidding, no one but me is collecting VTech gear arouns here!).

Anyway, the console is ordered and will be shipped on monday. I'll post a follow-up when I receive it. I hope it will help figure out the pinout, and I'm not sure how useful the data in the cartridge will be in figuring out how things work, if it's only an expansion to the built-in game it may or may not have a lot of code. I hope I can manage to dump some ROMs, and then maybe attempt to write an emulator?

I have some scans of the manual and packaging, as well as pictures of the cartridge. Let me know if you need them, I'm too lazy to upload them all right now.

More VTech hacking

Posted by pulkomandy on Sun Mar 28 21:53:57 2021  •  Comments (0)  • 

Oh wow, have I not made any progress on VTech things since 2017!?

Anyway, you may have read the previous article about this. I have mentionned this to a few people and eventually one of them contacted me, informing that there was more ongoing work on the V.Smile. Having other people to discuss things with has renewed my interest in these things.

This resulted in a 3 hour bike ride to get yet another V.Smile, including a complete set of controllers (dance mat, the two different available keyboards, and a graphics tablet. The seller asked me if I needed some games and who would be using the system. Their reaction when I told them that the console was for my own use and that I would program my own games for it was well worth the long bike ride as you can imagine.

For now this results in a new Wiki for V.Smile things and some progress in documenting the hardware there. This was a work of collecing info from old datasheets recovered from archive.org, cross-checking with the existing emulators, and a bit of guessing. I also finally started using my logic analyzer, and documented the protocol for the controllers (not all of them yet, because the graphic tablet need batteries and I don't have enough).

There is also some work in progress (not only by me, it's nice to be in a team) to write an assembler targetting the V.Smile CPU, and a development Smartridge is being worked on as well. So that should finally put V.Smile development within reach of more people.

I also contacted Bobzy again and learnt that he was working on the VTech IQ unlimited laptop (also known as the Equalizer in the US, apparently). It has 2MB of RAM, and a Motorola Dragonball EZ CPU. The display is a reasonable 480x272 pixels and support grayscales. So I found one on eBay and it will soon be delivered to me. Bobzy has been working on a Linux port, but I wonder if EmuTOS would work, to provide an alternative to Atari's own Stacy and ST Book laptops (which are either bulky and heavy or rare and impossible to find). Wouldn't it make a nice lovely little machine?

I thought this was the most powerful machine in the VTech lineup (excluding the boring modern things that run Android), but it turns out I had missed the VTech Helio PDA, which is faster and has more RAM, as well as an almost opensource OS (they published the source with a rather permissive license, except you are not allowed to use them for other hardware). I may keep looking for one of these as well (if I can find one at an acceptable price or with a flashy color plastic, not boring blue).

Considering all this new hardware made me remember that I had unexplored/undumped machines at home too. So I did some research on the CQFD Scientus, which I had come accross in a garage sale a few years ago. I thought I had broken something when disassembling it but iit turns out it was just a wire desoldered from the motherboard.

I was curious about the CQFD branding. The macine design looked somewhat similar to VTech things, and Internet knew nothing about this machine. And the motherboard has VTech chips. I discovered that CQFD is a second brand created by VTech France to position their machines more as toys (as if the existing machines didn't look enough like toys already). It apparently existed between 1998 and 2001.

Other than that the Scientus is not super interesting, I suspect it will be running a Z80 based system like many other VTech machines, but the display is just too small to do anything useful with it. Not to mention there are some empty columns, in a weird mix of text mode (where you would have 8x8 cells of pixels separated from each other) and graphics (where it would be a single continuous matrix).

I should dump the ROM still, to explore what's in it. Surprisingly it's an UV erasable EPROM, which I guess indicates that this machine was not produced in huge quantities (otherwise VTech would probably have made a proper mask ROM for it?).

Also while looking at it I found out that one chip used for sound generation is in common with the IQ Unlimited laptop. I saw a TI logo on it and now I suspect that it is only a volume control chip (as they have some in a similar package for which I found datasheets).

See you soon (well... sometimes in the next 4 years?) for more news about this!

Polypus reverse engineering

Posted by pulkomandy on Sun Jan 28 16:27:50 2018  •  Comments (0)  • 

Je me suis souvenu récemment d'un jeu auquel j'ai joué il y a fort longtemps. Il s'agit de Polypus, un shareware dont le principe est de conquérir un tableau hexagonal en y déployant son armée de poulpes (rouges ou bleus).

Il m'a pris l'envie d'y rejouer. Mauvaise idée, puisque le jeu avait presque complètement disparu d'Internet! J'ai retrouvé le site de l'auteur mais le jeu n'était plus mentionné.

Après avoir retourné plusieurs serveurs FTP, j'ai fini par retrouver un installeur (pour la version américaine, mais ça fera l'affaire). J'ai extrait les fichiers (7zip sait extraire les installeurs InstallShield ainsi que les fichiers cab contenus dedans) et récupéré l'exécutable du jeu. J'ai pu le lancer, mais je n'ai pu voir que l'écran d'accueil. Le jeu lui-même donne un écran complètement noir!

Il va falloir creuser pour trouver ce qu'il se passe!

Trouver les ressources

Le jeu est distribué sous forme d'un exécutable, sans aucun autre fichier. Les images et sons sont donc forcément directement dans le fichier. Mais une exploration avec binwalk ne révèle rien de très intéressant (pas d'en-tête d'images BMP ou GIF, par exemple). Ils sont donc dans un format inhabituel.

En creusant un peu, j'ai fini par utiliser Resource Tuner, qui permet d'accéder aux ressources du programme. On voit que celui-ci est écrit en delphi et qu'il y a des "forms" de près d'un 1Mo, ce qui est surprenant. En regardant de près on voit deux gros tableaux d'octets, "TDGCImage" et "TDGCSounds". Tiens tiens...

En cherchant "DGC Delphi", on trouve le Delphi Games Creator, une vieille bibliothèque pour faire du DirectX 3 (!) en Delphi. Il a plus ou moins disparu d'internet, mais un autre utilisateur de cette bibliothèque a pensé à en archiver une copie. On peut récupérer avec celle ci des éditeurs pour des bibliothèques de sons et d'images. Resource Tuner permet d'extraire les tableaux d'octets en fichiers, que l'on peut ensuite ouvrir avec ces éditeurs. Cela marche bien pour les images, mais l'éditeur de sons refuse de se lancer sous Windows 7!

Il va donc falloir creuser un peu pour extraire les sons (et les images aussi, car on peut les voir, mais pas les exporter dans un format normal depuis l'éditeur, et prendre une capture d'écran ferait perdre les informations sur les pixels transparents). Heureusement, on a le code source de la bibliothèque qui permet de charger ces images, donc on peut partir de là pour essayer de comprendre le format, qui de toutes façons n'est pas bien complexe.

à suivre...

Hacking VTech stuff

Posted by pulkomandy on Tue Dec 12 22:11:08 2017  •  Comments (0)  • 

This summer I bought more VTech hardware, namely a V.Smile pocket and a Genius TV Progress (known as Nitro Vision in the US). The latter is quite obscure even by VTech standards and nothing is known about it yet, it's also impossible to disassemble cleanly (case is glued together) so I will order a second one just for disassembling purposes. These are both from 2006, and apparently the last machines from VTech to have a keyboard (the V.Flash/V.Smile Pro does not have one, and later stuff is only tablets. What's the fun in these?)

I previously played around with the Genius PC, an older machine (1998-ish) from VTech based on a 68000 CPU, for which I dumpled the system ROMs. It eventually ended up emulated in MAME and there is ongoing work by other people to figure out the remaining parts of the hardware (mostly, sound output).

For now, let's focus on the V.Smile. It's a quite succesful console for children and thanks to the great work of the Hackmii team back in 2010, we do have some knowledge about the hardware. It apparently uses a Sunplus µ'nSP core, which is not very common but they managed to locate enough docs to get it more or less emulated in MESS.

They mention a GPL-violating version of GCC, but it turns out Sunplus actually does comply with the GPL and dropped the sources of their GCC fork on sourceforge. It is apparently based on gcc 2.95.2 (I can't complain about that, I'm an Haiku developer), and that makes it a little difficult to compile on… well, anything really. Also it is just a source drop without documentation nor compilation instructions.

It took me a while to figure out how to configure the thing, as the configure script does not mention support for the unsp architecture. It turns out, the gcc configure script has a feature for "local" CPUs which we need to use here. On Linux, the command line looks something like this:

linux32 ../unsp-gcc/configure --target=unsp-local --enable-languages=c,c++

The linux32 environment is needed because gcc2 configure script has no idea about x86_64. The enable-language is needed because the objective-C build is broken and I don't care about it anyway (enough obscure stuff already).

The build fails with a complaint from bison that $$ is not ok to use. This is because bison became more strict in some "recent" version. But we can patch the file according to the instructions in some random mailing list post or a more detailed patch from another compiler with the same problem.

There is some more bison-version-related hacking to do, but eventually we get past that with this patch.

Building the compiler on Haiku

As if this was not crazy enough, I also tried to build the compiler on Haiku. It didn't work.

On Haiku we hit a similar problem, but the "local" trick saves us as well:

../unsp-gcc/configure --host=i586-local --target=unsp-local

We get a Makefile in either case. The Linux build fails because Yacc is confused about use of $$. The Haiku build complains about a missing xmalloc.o. It looks like I have more work to do.

Printing on a Color StyleWriter

Posted by pulkomandy on Fri Jul 14 21:02:32 2017  •  Comments (0)  • 

Je suis l'heureux propriétaire d'une imprimante Apple Color StyleWriter 2400. Je l'ai récupérée il y a fort longtemps avec un lot de Macintosh qui partaient à la poubelle.

Cette imprimante date de 1994, elle a été vendue par Apple mais le matériel est conçu par Canon. On peut donc utiliser des cartouces de cette marque.

Et donc, après une dizaine d'année à traîner dans un coin de mon bazar, il était temps de remettre cette imprimante en service!

Étape 1: la brancher

Une particularité des imprimantes Apple de cette époque est d'utiliser un port série. En effet, les Macintosh n'avaient pas de port parallèle comme les PC. En plus de ça, pour gagner de la place sur la face arrière de ses machines, Apple a très vite laissé tombé le connecteur DE-9 pour utiliser à la place une mini-DIN. Rien de grave: on trouve le cablage par exemple ici. J'ai coupé un cable série Apple en 2 et j'y ai soudé un connecteur DE-9, et c'est parti!

Étape 2: les pilotes

Normalement, cette imprimante est sensée fonctionner avec un Macintosh de 1994. Évidement il n'y a pas de pilotes pour les systèmes plus récents. Mais, on a de la chance, quelqu'un a fait une grande partie du travail avec lpstyl. C'est pas vraiment un driver, plutôt un exécutable qui sait juste prendre une image dans un format bien précis, et l'imprimer. C'est prévu pour s'intégrer dans une chaîne d'impression UNIX, entre d'autres programmes qui vont convertir le fichier à imprimer en image, et le port série de l'ordinateur.

J'ai donc récupéré les sources et fait quelques ajustements pour que ça marche avec Haiku, mon système d'exploitation préféré. Et surtout, j'ai du ajouter quelques délais, car le code d'origine est trop rapide sur mon PC et n'arrive pas bien à se synchroniser avec l'imprimante. Bref, après quelques ajustements, l'imprimante prend une feuille de papier, le chariot se met en mouvement et… à la fin, j'ai une page blanche.

Étape 3: l'encre

Ben oui forcément, après 10 ans à dormir, la cartouche d'encre est toute sèche. Hereusement sur ce modèle, on peut remplacer le réservoir d'encre mais aussi la tête d'impression (qui est elle aussi pleine d'encre sèche et donc bonne à jeter). Par contre, Canon ne fabrique plus ces têtes d'impression (on trouve facilement les cartouches avec seulement le réservoir d'encre). J'ai fini par trouver un ensemble tête d'impression + cartouches noir et couleur pour pas trop cher chez un vendeur anglais. J'avais un peu peur que l'encre soit sèche après probablement 10 ans passés sur une étagère. Mais non, les cartouches sont vendues dans un emballage scellé sous pression, et avec un petit feuillet plastique de protection.

Du coup, j'ai juste eu besoin d'installer la nouvelle cartouche et j'ai enfin pu imprimer une page de test.

Étape 4: intégration avec Haiku

Bon, c'est bien joli d'imprimer une image de test, mais je peux toujours pas cliquer sur fichier/imprimer dans mes programmes et obtenir une sortie sur papier directement. Il va falloir intégrer ça proprement.

Ce sera l'occasion pour moi d'apprendre à écrire un driver d'imprimante pour Haiku, et probablement de débugger quelques petites choses dans le support de l'impression en général. De ce que j'ai vu, ça marche pas encore super bien.

Conclusion

Cette imprimante est plutôt solide et efficace, et elle fonctionnera sans doute encore de nombreuses années (tant que j'arrive à trouver des cartouches d'encre, en tout cas). Et autre bonne nouvelle, contrairement à la version Canon, il n'y a pas de compteur de pages qui met l'imprimante HS après un certain nombre de pages imprimées (soi-disant parce qu'il y a un réservoir d'encre usée qu'on ne peut pas vider dedans...).

J'ai donc économisé l'achat d'une imprimante neuve et qui aurait probablement duré moins longtemps.

MessagEase Keyboard

Posted by pulkomandy on Sat Apr 1 13:28:43 2017  •  Comments (0)  • 

I recently gave up on using my old "phonebooth" dumb-phones and switched to… a 10 year old Galaxy S. What an upgrade!

I of course updated it to CyanogenMod, which runs quite well on this device and allows me to get a reasonably "recent" Android version (4.4, which is old, but still compatible with most apps).

Anyway, the main problem with that phone was the keyboard. I was never very good at typing with the numeric keyboard on old phones, but for some time I have been using a Nokia phone with a physical keyboard, which was quite nice. While the tocuhscreen-keyboard on Android makes place for a much larger display, which is a very good thing, it has awfully small keys and no feedback. It also tries to auto-correct me in a way that is sometimes useful, sometimes not correcting obvious mistakes, but also sometimes trying to correct where it really shouldn't or when I'm already trying to correct myself.

As you may know, the QWERTY layout was designed as a workaround for mechanical limitations of early typewriters. There is no reason at all to continue to use it today on physical keyboards, and even less on smartphone virtual ones. Surely, there had to be something better!

After some research, I found the MessagEase keyboard. It is, as expected, an input replacement for Android. The keyboard has just 9 keys, but each of them has 9 chars depending on the gesture you make. It is easy to learn (even if at first you have to do a bit of hunt and peck), and allows quite fast typing. It also has some interesting features, for example the keyboard can be made partially transparent, so you can still see a little of what's under it (not all applications put something under it, but some do). It is also very configurable (you can move characters around on the keyboard and change many other settings).

After a few days of training, I can type at a reasonable speed, and much less typos than with the normal keyboard. So this is something I would recommend to everyone using their phone display as a keyboard. Forget about QWERTY before it is too much hardwired into your muscle memory there!

Now, I need to compare this with Graffiti, which is now available on Android. I remember using that in the Palm days, but I didn't do a lot of writing with it, so I don't remember how fast it could go. Also, using it without a stylus will probably be quite different. But, I should give it a try and see what happens.

Bitbox laptop

Posted by pulkomandy on Tue Nov 24 22:20:55 2015  •  Comments (1)  • 

This article is about the bitbox. If you don't know about it yet, click the link and read about it.

I got my bitbox last year, and it quickly became quite annoying that each time I wanted to use it, I had to unplug the LCD from my PC, locate my gamepad, an USB cable to power it, remember which of the USB ports the gamepad must be plugged to, etc. I also always feared that while carrying the bitbox in my backpack, I would bend a pin on one of the connectors or something.

Well, I solved these issues. I could have gone with a 3D printed case and whatnot, but I went with the simpler solution: make a laptop-like case using some easily hackable devices!

the bitbox laptop!

You can easily build one yourself. You need the following parts (dx.com links included):

Assembply instructions:

  • Remove the backpanel from the TV so it is thin enough to fit the tablet support in the keyboard.
  • Cut some holes in the keyboard cover to make space for the bog capacitors on the TV PCB (easily done, the keyboard cover is only thick cardboard)
  • Locate the 5V regulator on the TV PCB and solder a wire there to power the bitbox
  • Plug the keyboard and TV to the bitbox (you need the VGA gender changer here), and glue the bitbox next to the display (they both fit)
  • Enjoy!

There is some room for improvement. The setup currently doesn't include a battery (I wanted to use an USB "power bank", but the LCD display needs 12V), and the VGA connector is needlessly bulky, especially with the gender changer. I could solder the wires directly to the bitbox and ignore the connector, but I like to be able to remove the bitbox from this. Maybe I should add an HE10 or some other connector for the display output.

So, what is it useful for? Well, you can run all the bitbox games and apps (as long as they can be used with a keyboard). The ZX works fine, but I would prefer a more friendly on-line development interface (Amstrad CPC emulation was suggested, but I think a better idea is a native BASIC/Lua/Forth/Squirrel/whatever). One can also run the chiptracker there, but that needs audio output, which the LCD I used unfortunately doesn't include.

Maybe someone can suggest a reasonably flat and small loudspeaker to fit into this? And what about the battery? There are some 12V batteries on dx but they will need some charge control. Or should I use my USB thing with a boost converter?

Radeon 7000 on Windows 7

Posted by pulkomandy on Mon Aug 18 22:02:04 2014  •  Comments (0)  • 

As you know, Windows XP is EOL now. However, I'm still using that machine I assembled in 2003 as my only Windows computer, and I don't plan to change that. So I went ahead ans upgraded it to Win7.

Everything works fine, except the video card. Windows will complain that it needs a DirectX9 card. I know such a thing can be found even for my old AGP motherboard, but that's more money than I want to spend.

AMD won't provide drivers for such an old card for the new windows (Vista and 7). You can force-install the XP driver, and it will mostly work, but the system will BSOD on shutdown. Not so nice.

The solution is simple, once you have found it. The drivers for Windows Server 2008 will work perfectly. In the case of my Radeon 7000, these can be downloaded from Dell's FTP.

Note that the installer won't work, but using the inf files provided with the driver will go fine. And I now have my PC running as it should again.

I should look into Windows Server drivers for more of my hardware. It looks much less bloatware-enabled than the mainstream versions and gets the job done.

Reviving a Turbo-XT

Posted by pulkomandy on Tue Aug 5 16:33:51 2014  •  Comments (0)  • 

How I got an XT motherboard

This week I got an old PC/XT clone motherboard back in working order.

I had this board on my parts bin for some years. My cousin had found a PC/XT on the sidewalk, probably some company threw it away when the power supply failed. Unfortunately, it came with no keyboard, monitor, or even floppy drive.

Inside the original box (a big desktop-style one) was the huge and heavy power supply, the motherboard, an Hercules compatible card, a floppy controller, an MFM hard disk and its controller card.

I had already tried replacing the power supply with a standard AT one (the connectors are similar enough) and I could hear the PC speaker beep, so I knew the POST test was passing, however, without the monitor and keyboard, I couldn't do much more. The hard drive would not spin up. I only kept the motherboard and the 3 expansion cards, and got rid of the hard drive, case and power supply.

The computer comes with an Hercules compatible video card. This is a monochrome display, but more importantly it uses the same refresh rates as MDA: 50Hz vertical and 18.6kHz horizontal. This does not match the 15.6kHz used by TVs and CGA, nor the 31.5kHz used by VGA. Attempts to use ISA VGA cards on this motherboard weren't very succesful. So I let the boards sleep for a few years in my parts bin.

Seeing it boot

Last month, the "8088 domination" demo was released. This got me thinking about this motherboard again and I decided to see if I could do something useful with it. I installed it in a baby-AT tower case which takes less space than the original and started researching a solution for using the MDA card. I first thought of connecting it to my CTM640, which is normally a 15kHz monitor, but can be adjusted a bit using a potentiometer. I had to build a sync mixer to merge the horizontal and vertical sync signals (I simply XORed them together using 74LSxx chips). I could get some garbage on screen but the sync didn't work, so it was just unreadable text. However I knoew the MDA card was worknig properly, as I could see some generated video and check the sync lines with an oscilloscope.

I started looking for scanrate converters, but it seems so far there is no cheap solution that officially supports MDA. It's possible to find some VGA to composite or VGA to HDMI converters, and I think some of these may be compatible. However, while researching those, I noticed they work pretty much like the input section of most modern LCD displays. This gave me the idea to test my LCD (which is actually a TV with SCART, VGA and HDMI outputs) to see which frequency range it would accept.

I booted Haiku and used the screenmode command to set a custom video mode using a modeline. I couldn't find the exact timings for the MDA/Hercules cards online, however they are fairly easy to compute from the CRTC settings, which I found on John Elliot's page about Hercules cards (you just multiply the character-based settings by the character horizontal or vertical size). It turns out this LCD will handle a 18kHz HSync just fine.

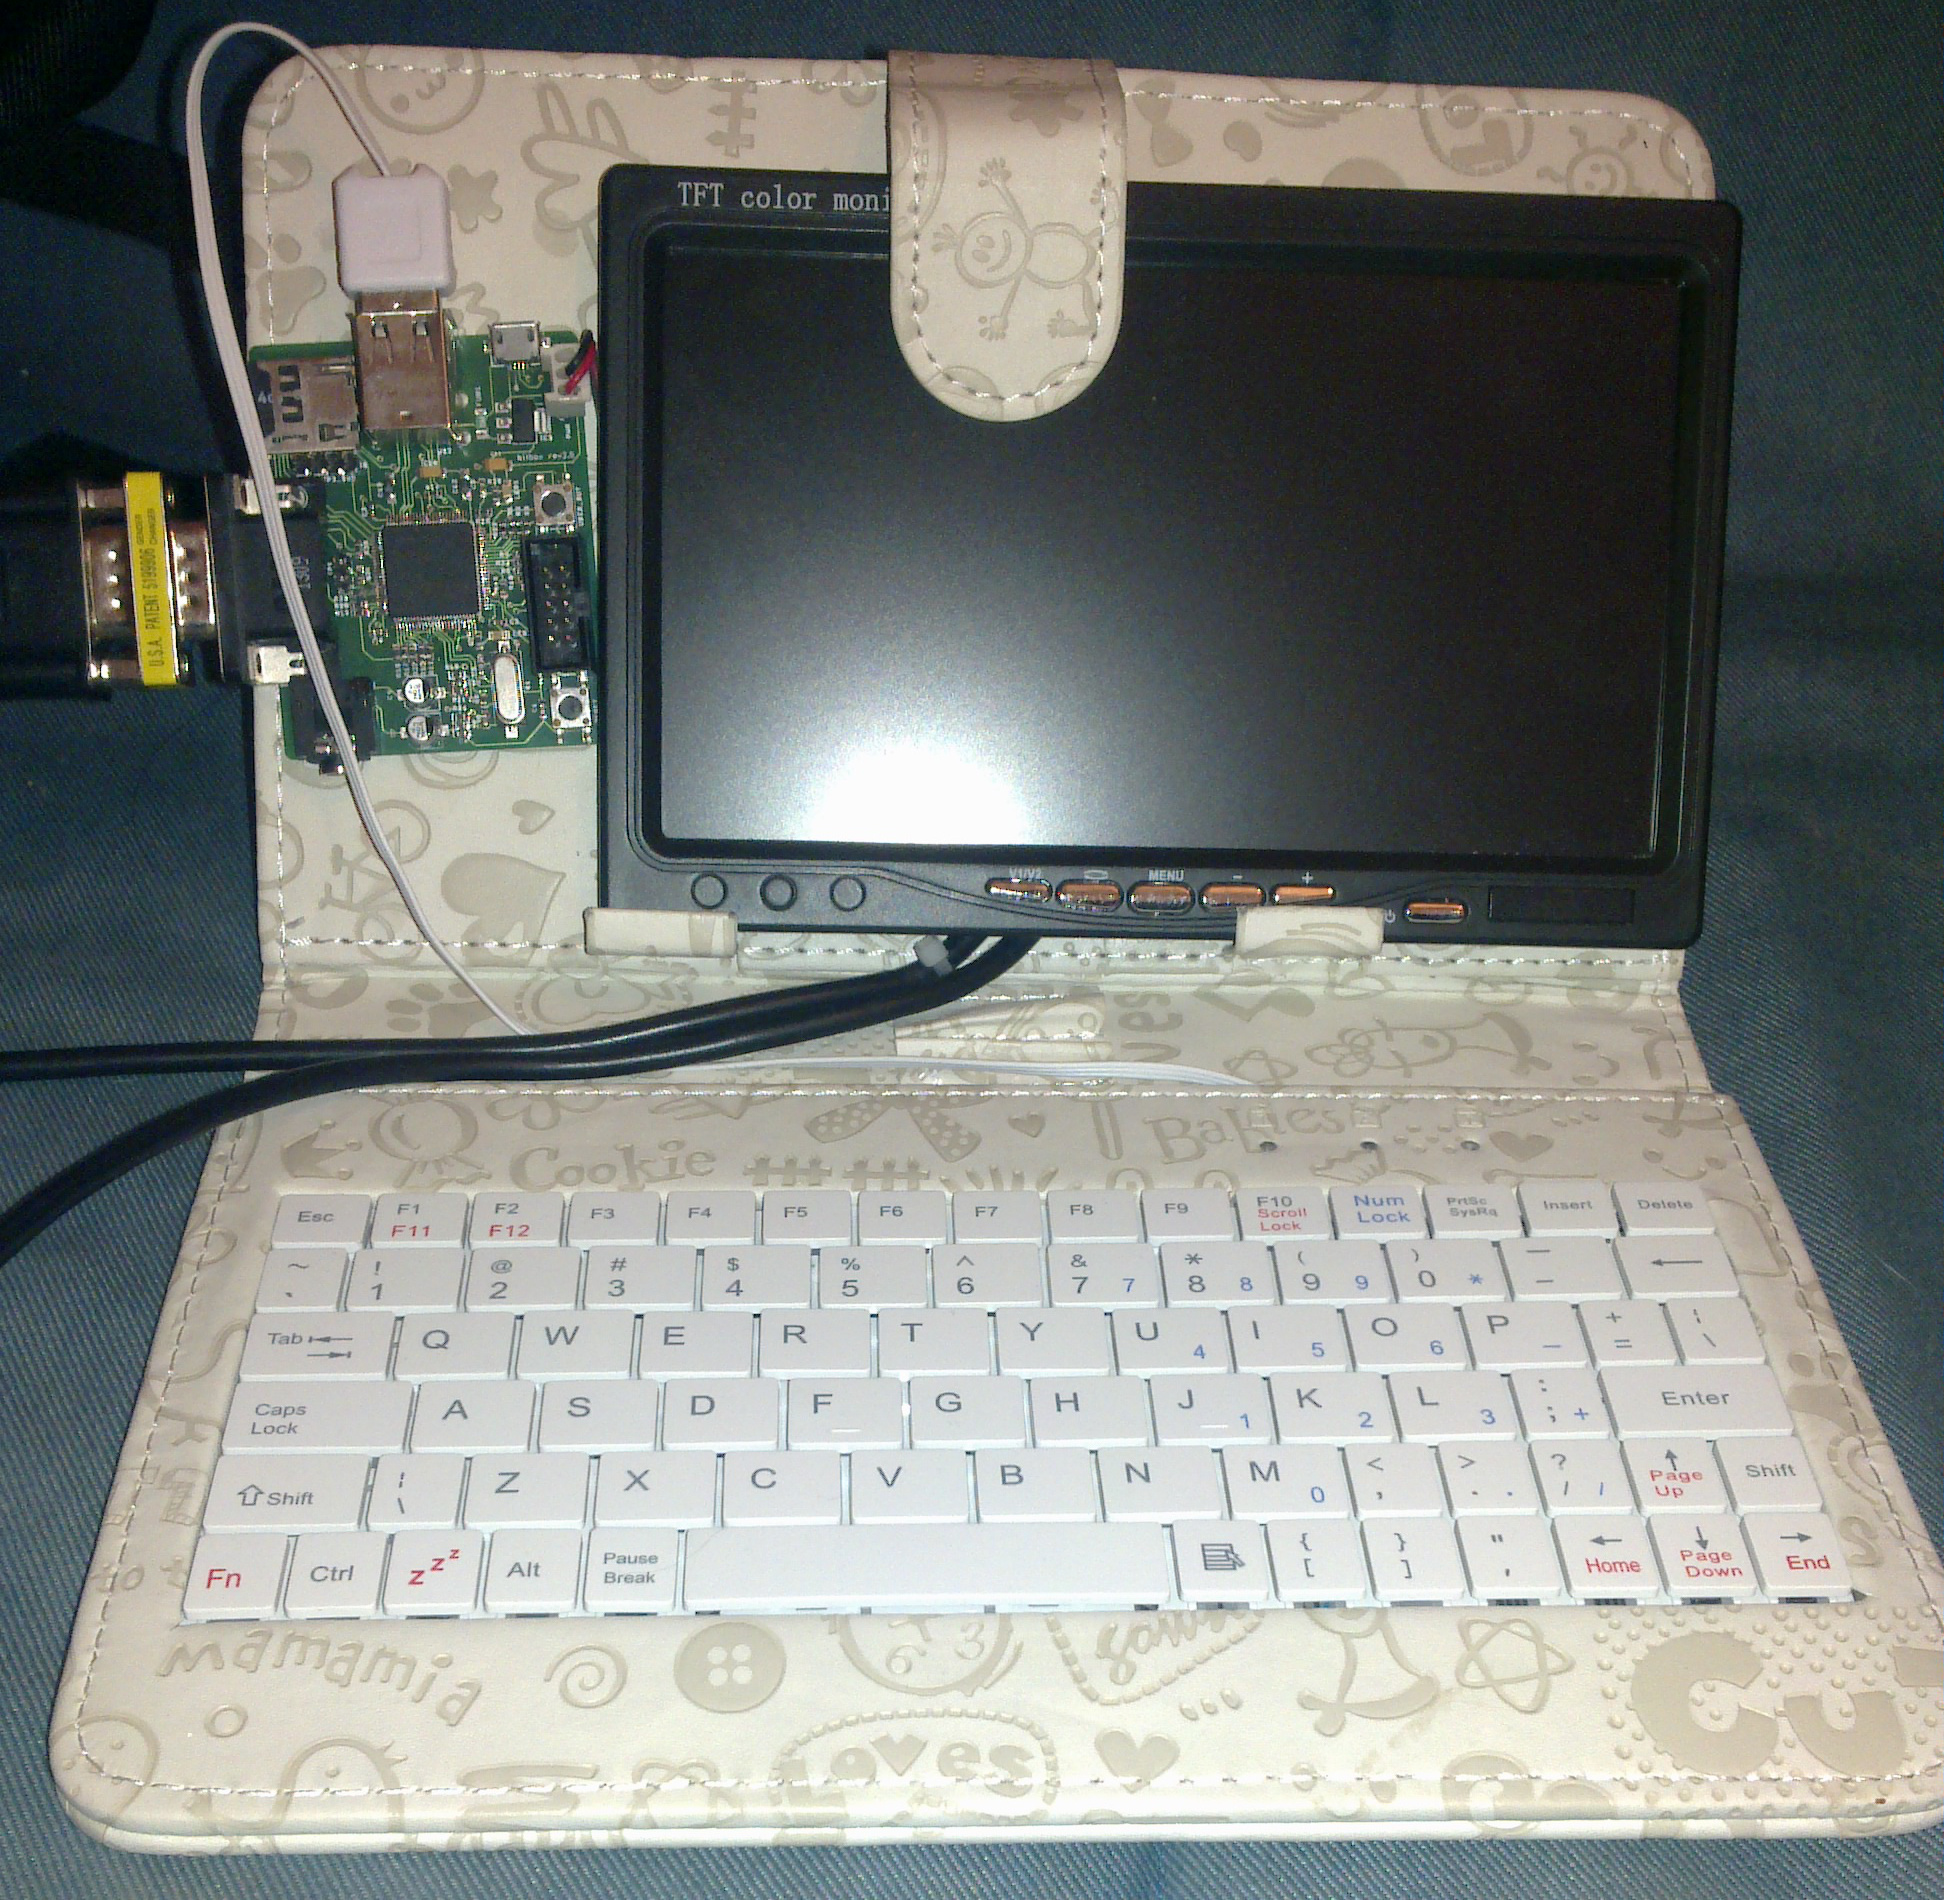
The next step was wiring an MDA to VGA connector adapter. The wiring is straightforward, I connected the "monochrome" output from the video card to the green channel, and the "intensity" to the red one. The VGA port should need a 0.7v signal, but it turns out my LCD accepts the 5V TTL just fine (it's a Linetech LF1912HD01, but that brand or model probably disappeared from stores already). So I could finally see the bootscreen!

User input needed

Ok, without a keyboard, being able to boot DOS isn't so useful. And as you should know, the PC and PC/XT use a different keyboard protocol from later models, so using a standard PS/2 keyboard directly is not possible.

This is a long-solved problem, with the guis at the Vintage Computer Forum having an adapter built around a small PIC12 chip. But I don't like PICs and prefer AVRs. There is an AVR version of the adapter, but the code is big and clumsy, where a small and simple one would do the job just as well.

So I designed my own keyboard adapter. The code is C and should be fairly readable. It uses the same PS/2 library I used earlier for my PCW and Amiga keyboard adapters. The lib had some problems and this was a good occasion to review it, clean it up, and do some more testing. On the XT side, things are rather simple as I just need to send the single byte keycodes with a standard clock signal. This is implemented on the XT side using a 74LS shift register, which is quite flexible on the timings.

So, I now have the adapter (named XTK) working, on two different boards I had lying around. One uses an ATMega8 or ATMega48, the other uses an ATTiny2313. You can find the code at the avrstuff repository. However, for the final version of this I plan to use an ATTiny13 and fit the whole adapter circuit inside the DIN connector. I want to get my prototyping boarsd back, and a small integrated circuit like this will be much less fragile.

While I was at it, I also replaced a burnt LED in my Olivetti keyboard. It has a nice yellow caps lock LED again. But I didn't update the PS/2 library so it controls the keyboard LEDs yet. That will come later.

Mass storage

Ok, I fitted a 5"1/4 floppy drive in the machine so I could boot DOS and test the keyboard at a prompt. This is working quite well, but swapping floppies gets annoying and I'd rather keep my other floppy drives for other projects. This PC originally came with an MFM or RLL hard disk, which was broken when I got my hands on it. Replacements are hard to find, and they are heavy and noisy. Instead, I plan to use a compact flash card. I could buy the amazing XT-CF or XT-IDE boards, but even if they are quite cheap, it's more money than I want to waste on this computer. So let's see if I can continue doing things with just my parts bin.

First, I need a way to connect the "XTIDE universal ROM" so I can access my CF card using the usual DOS interrupts. My motherboard has 6 ROMs slots on it like the original 5150 PC. Only one is used for the BIOS, the next 4 are for the IBM BASIC, and the last one is for an expansion ROM. I used this one for the XTIDE ROM. On this motherboard the ROMs have a standard pinout, so I could easily put the XTIDE universal ROM on a 27C256 chip (copied 4 times to make sure the system can see it). After some hacking on my EPROM programmer, I got it to reliably program this in the ROM. So that's one problem solved.

I also need to connect the compact flash card. It turns out I can use the IDE port on a sound card, and XTIDE can set the CF card to 8-bit mode to avoid the use of the 16-bit bus, which is of course not wired on my machine. This is the same trick I use on my CF adapter for CPC. (you need XTIDE version 2 to use this feature).

However, I need a non-PNP card with an IDE port for this to work. The BIOS doesn't know how to initialize PNP cards, and if I wanted to do it using the manufacturer provided drivers (assuming they can run on a 8088), I'd have to boot DOS first. Time to dig out that Sound Blaster 16 which is the only non-PNP card I have around. Mine comes with an IDE port which I set to address 1F0.

With the sound card and the CF adapter plugged, the XTIDE installation tool detected everything just fine and I could prepare the ROM file suitable for my machine. I saved this back to disc (my UVPROM can't be programmed on the fly on the motherboard like the flash chip on XTIDE would), got that file back to my other DOS PC where I could finally put it on the ROM. I seated that ROM in the XT and could see the XTIDE welcome message. Some FDISK later I could boot DOS from that compact flash, it works quite well and DOS boots in less than a second (but there aren't much drivers to load).

The software!

Well, now that the thing is running... what to do with it? I ran through my 5"1/4 floppies and found that a lot of the software there is meant to use with either CGA, Tandy PCJr, or some later video card. But there are some games for the Hercules card as well. Of course none of those use the Sound Blaster (even in AdLib mode), they all go for the PC speaker. I had more success with the tools such as QBasic and Turbo Pascal, but I'll probably cross compile things I want to run on the machine.

An obvious thing to do on a 8088 based machine is to run "8088 Corruption". I thought this required a CGA card, but MDA support is now available. However, and as pointed out by Trixter, I found that the Sound Blaster 16 wouldn't work on a 8088 based box because it needs some tools in the autoexec to initialize it. However, I found a workaround to this once again on the Vintage Computer forums. A simple DEBUG script can be used to initialize the card.

o 224 80
o 225 02
o 224 81
o 225 02
q

I added this to my autoexec.bat, and it worked! I can now use the card (as a Sound Blaster 2.0, the 16-bit DMA obviously won't work). The mixer volume is quite low, so I may have to extend this debug script or try to run one of the mixer tools if I can find one that runs on the 8088. Or I could get a Nec V20 which would run all this software fine.

Getting it on the network!

I tried using a 3Com Etherlink III as an extra extension ROM slot. That didn't work, but I stopped messing with it when I noticed that the motherboard already had a slot for XTIDE. Maybe I can add some ethernet connectivity to this machine with this card. However, 3COM tools to configure it don't seem to detect it. I may need an alternative driver that supports the 8088, just like for the sound card.

Configuring MSYS for real work

Posted by pulkomandy on Mon Jul 16 21:18:16 2012  •  Comments (0)  • 

People always request Windows binaries for some of my project, so I'm using a fairly complete MinGW/MSYS setup to get this done. However, the default setup for MSYS is not very efficient and doesn't manage to blend well in a Windows install (which is kind of expected). Here are some tricks to make it behave a bit better.

Bash prompt

An improvement on my existing "exit-status-colored" bash prompt. In Windows the path get long very easily (starting with "/c/Document and Settings/user/My Documents" before you've even got anywhere!). So here's a bash prompt that looks just like the previous one, but truncates the path to the last 4 elements. It's rather useful for other OSes, as well.

function exitstatus {
 if [ "$?" -eq "0" ]
 then
	COLOR=32
 else
	COLOR=31
 fi
}

PROMPT_COMMAND=exitstatus

PS1='$(
 IFS="/"
 d=3
 p=($(echo "\w"))
 e=$((${#p[@]}-1))
 P="\w"
 if [ $d -lt $e ]; then
 b=$(($e-$d+1))
 P="${p[$((b++))]}"
 for ((;$e-$b+1; b++)); do
 P="$P/${p[$b]}"
 done
 fi
 echo -n "\[\e[01;$COLOR;40m\]\u@\h\[\e[39m\]:\[\e[01;34m\]$P \[\e[0m\e]0;$P\$\a\]\$ "
 )'

While you're setting up bashrc and profile, you likely also want to setup $EDITOR, and the usual ll and la aliases (to ls --color).

Terminal emulator

The default setup uses Windows' DOS shell window to run bash. This gets annoyingvery quickly : it is not resizeable and has a lot of other bugs. I tried Console2 for a while but wasn't too happy with it either. The MinGW-provided rxvt seems to work fine. MinTTY looks interesting, but I didn't notice it before I was done with rxvt. Maybe next time...

Anyway, the default settings for rxvt are not too nice. I did some changes to make it a bit nicer and more useful. The first step is to open MSYS.BAT and replace the rxvt start command (start %WD%rxvt ...) with this:

set HOME=/home/USER
start %WD%rxvt -backspacekey ^H -sl 2500 -fn "Lucida Console-11" -fb "Lucida Console-11" -sr -geometry 132x50 -e /bin/sh --login -i

The HOME variable is set so rxvt can find .Xdefaults, and I also changed the font, increased the window size, and removed some color-related options.

Next step is to add a .Xdefaults file in the aformementionned HOME directory. There we'll setup the colors to look a bit nicer. Notice I used the same font for bold and normal text (rxvt bold rendering looks bad). So I set up different colors for bold and non-bold, so I can see all the 16 colors (rxvt could support up to 256, but this is not compiled in the mingw version). Here's my colorscheme.

Rxvt*color0: black
Rxvt*color1: orangered
Rxvt*color2: forestgreen
Rxvt*color3: gold
Rxvt*color4: dodgerblue4
Rxvt*color5: indigo
Rxvt*color6: cyan4
Rxvt*color7: azure3
Rxvt*color8: darkgrey
Rxvt*color9: crimson
Rxvt*color10: darkolivegreen1
Rxvt*color11: darkorange
Rxvt*color12: dodgerblue
Rxvt*color13: deeppink
Rxvt*color14: aquamarine
Rxvt*color15: white
Rxvt*background:gray7
Rxvt*foreground:aliceblue

More apps

Now install vim and svn (tortoiseSVN provides svn command-line client as an option in the installer), add them to bash path, and you're ready to go.

A little annoyance left : when started from bash, vim will read config in /home/user. When started from anywhere else, it will read in document and settings/user instead. So you have to copy your vimrc and vimfiles in both places.

Prompt Bash

Posted by pulkomandy on Sun Jul 17 16:50:09 2011  •  Comments (0)  • 

This bash prompt shows up in red when the last command failed ; green if everything is fine. It also sets xterm window title to the current directory. It displays a classical user@host$ prmpt, other than that. Put this in your bashrc file to enjoy it.

#fonction exécutée avant chaque affichage du prompt
function exitstatus {
        #récupère la sortie de la dernière commande
 if [ "$?" -eq "0" ]
 then
        # 32 : vert
     PS1='${debian_chroot:+($debian_chroot)}\[\033[01;32m\]\u@\h\[\033[00m\]:\[\033[01;34m\]\w\[\033[00m\]\$ '
 else
        # 31 : rouge
     PS1='${debian_chroot:+($debian_chroot)}\[\033[01;31m\]\u@\h\[\033[00m\]:\[\033[01;34m\]\w\[\033[00m\]\$ '
 fi
    # Ajoute le changement de titre des fenêtres xterm
    PS1="\[\e]0;${debian_chroot:+($debian_chroot)}\W\$\a\]$PS1"
}

PROMPT_COMMAND=exitstatus

A variant for mksh is also available (with default/red colors, but it also prints the error code!). Put this in your mkshrc file.

function precmd {
	typeset e=$?

	(( e )) && print -n "\x1B[31m$e|"
}
PS1='
$(precmd)${USER:=$(ulimit -c 0;id -un 2>&-||print \?)}@${HOSTNAME%%.*}:$(
	typeset d=${PWD:-?} n p=~; [[ $p = ?(*/) ]] || d=${d/#$p/~}
	(( ${#d} > (n = (COLUMNS/3 < 7 ? 7 : COLUMNS/3)) )) && {
	d=${d:(-n)}; p=...; } || p=; print -nr -- "$p$d") '"$PS1 "

Trac subcomponents

Posted by pulkomandy on Thu Jul 14 16:50:15 2011  •  Comments (0)  • 

Just a little note, I set up a repository for APlayer and wanted to use subcomponents for issue reporting. This was a feature I used for years in Haiku bugtracker. It turned out to be a customization from the Haiku project. You can grab it there, along with other useful Trac mods.

Recuperer un fichier efface

Posted by pulkomandy on Tue Aug 4 19:07:12 2009  •  Comments (1)  • 

Une fausse manipulation peut arriver à tout le monde (surtout à moi)... Voici l'astuce secrète que j'utilise pour récupérer un fichier effacé par erreur. Elle a ses limites mais elle m'a déjà rendu quelques services.

grep -aC 1000 "morceau de contenu du fichier" /dev/hda2 > /mnt/autrepart/dump

Comment ça marche : grep va lire le contenu complet de la partition où se trouve le fichier effacé (ici hda2), filtrer ce bazar et retrouver le morceau que vous lui spécifiez, pour chaque occurence trouvée, il va l'enregistrer dans le fichier dump, avec les 1000 lignes précédentes, et les 1000 suivantes. Il ne vous reste plus qu'à récupérer les morceaux de votre fichier dans ce dump...

Cette méthode est limitée : d'abord ça marche mal avec les fichiers binaires. En plus, ça prend beaucoup de temps et il faut plein de place pour stocker le fichier dump. Il faut aussi se souvenir d'un morceau caractéristique de votre fichier, ce qui n'est pas toujours évident. Mais, c'est déjà mieux que rien. Pensez quand même aux sauvegardes...

FluxBB et Gravatar

Posted by pulkomandy on Sun Jun 28 00:58:17 2009  •  Comments (1)  • 

gravatar.com est un site qui offre un service global de stockage d'avatars. On s'inscrit une fois, on uploade un avatar, et on peut l'utiliser pour tous les sites qui supportent le système. Je suis administrateur d'un forum fluxbb et j'ai décidé de mettre ça en place plutôt que de laisser les utilisateurs remplir mon serveur avec leurs avatars. Ça a été plutôt simple a faire:

gravatar.com is a website allowing his users to register, upload their favorite avatar once, and then use it everywhere. I've added support for it to a fluxbb forum. The hack was pretty simple:

(code original de fluxbb dans view_post.php) (original code in view_post.php)

  if ($pun_config['o_avatars'] == '1' && $cur_post['use_avatar'] == '1' && $pun_user['show_avatars'] != '0')
  {
   if ($img_size = @getimagesize($pun_config['o_avatars_dir'].'/'.$cur_post['poster_id'].'.gif'))
    $user_avatar = '<img src="'.$pun_config['o_avatars_dir'].'/'.$cur_post['poster_id'].'.gif" '.$img_size[3].' alt="" />';
   else if ($img_size = @getimagesize($pun_config['o_avatars_dir'].'/'.$cur_post['poster_id'].'.jpg'))
    $user_avatar = '<img src="'.$pun_config['o_avatars_dir'].'/'.$cur_post['poster_id'].'.jpg" '.$img_size[3].' alt="" />';
   else if ($img_size = @getimagesize($pun_config['o_avatars_dir'].'/'.$cur_post['poster_id'].'.png'))
    $user_avatar = '<img src="'.$pun_config['o_avatars_dir'].'/'.$cur_post['poster_id'].'.png" '.$img_size[3].' alt="" />';
  }
  else
   $user_avatar = '';

(a remplacer par) (replace with)

  $grav_url = "http://www.gravatar.com/avatar.php?gravatar_id=".md5( strtolower($cur_post['email']) ).
//  "&default=".urlencode("http://une_belle_image").
  "&size=60";

  $user_avatar = '< img src="'.$grav_url.'">';

Le seul problème est que ça oblige tous vos utilisateurs a utilise gravatar pour leur avatar, il n'est plus possible de l'uploader chez vous ou de le faire venir d'un autre site. Mais vous saurez surement trouver une solution plus propre pour faire ça :)

The only drawback is that it enforces your users to upload their avatars to gravatar. They can't use another website or your own server. But i'm sure you can find a proper way to do it if you want :)

Convertir un script en HTML avec vim

Posted by pulkomandy on Fri Jun 26 22:17:31 2009  •  Comments (2)  • 

Une petite astuce qui permet de gagner du temps pour un site comme celui ci.

Plutôt que de parser mes pages à chaque affichage pour convertir les scripts et mettre des couleurs dedans, éviter les problèmes de mise en page lors de l'utilisation de < ou de &, j'utilise vim pour mettre mes scripts en couleur.

Il suffit d'utiliser la commande :TOhtml de vim qui s'occupe de tout. Ne reste plus qu'à enlever les en-têtes html générés automatiquement par vim et à copier le résultat dans un article. Ma feuille de style contient les classes utilisées et je peux choisir les couleurs facilement.

Script d'upload rapide en ftp

Posted by pulkomandy on Fri Jun 26 22:14:05 2009  •  Comments (0)  • 

Ce script vous permet d'envoyer facilement des fichiers sur un serveur depuis bash. Je l'utilise pour partager rapidement des fichiers depuis mon pc personnel directement sur mon serveur. À adapter pour votre serveur, login, mot de passe et dossier de destination, bien sûr...

#!/bin/sh
for i in "$@"
do
        if [ -f "$i" ]
        then
                HOST='serveur.com'
                USER='moi'
                PASSWD='mot_de_passe'
                FILE="\"$i\""
                ftp -n $HOST <<END_SCRIPT
                quote USER $USER
                quote PASS $PASSWD
                cd /ftp_upload
                put $FILE
                chmod 644 $FILE
END_SCRIPT
        else
                echo "$i is not a file !"
        fi
done

Configuration d'un serveur Debian

Posted by pulkomandy on Fri Jun 26 17:13:53 2009  •  Comments (1)  • 

Dans cet article, je vais détailler un peu la configuration de ce serveur. Le but était d'utiliser une machine peu puissante, mais peu bruyante et consommant peu d'électricité. Je considère que ce n'est pas terminé, donc, faites moi part de vos idées et de vos astuces pour l'améliorer.

Bien configurer le BIOS

Tout commence par là. J'ai désactivé dans le BIOS tous les périphériques inutiles. Cela permet d'économiser un peu d'électricité grâce à la gestion ACPI, et ça permet aussi d'éviter de charger des modules noyau inutiles, donc on récupère un peu de RAM. On enlève donc les lecteurs de disquettes et de CDrom (les alimentations sont débranchées), mais aussi les port séries et parallèle.

D'autre part, le mode de gestion d'énergie ACPI dans le bios est "économie maximale". Le processeur tourne lentement et chauffe moins, le disque dur est mis en veille au bout de 2 minutes

On gagne: de la mémoire et de l'électricité

On perd: la posibilité de brancher un terminal VT100 et de démarrer sur une disquette. Rien d'utile. On perd un peu en temps de réponse avec le disque dur en veille.

Les réglages de Debian

Il est également importnat de bien configurer Debian. Les deux modifications que j'ai fait sont le déplacement de /var/log et de /tmp dans des ramdisks afin d'éviter des accès inutiles au disque dur, et la desactivation de getty dans /etc/inittab. En effet getty occupe 6 fois 500Ko, et la mémoire vive est précieuse.

La mémoire vive libérée est utilisée par Linux comme cache disque. Mon système occupe moins de 16Mo de mémoire, il reste donc beaucoup de place pour ce cache. Cela permet d'avoir la plupart des pages de mon site dedans, ce qui fait qu'il est très rare que le disque dur soit réveillé lorsqu'un visiteur vient sur le site.

J'ai également monté tous mes disques avec l'option noatime, ce qui évite d'avoir à faire une écriture sur le disque à chaque lecture qui pourrait rester dans le cache.

On gagne: De la mémoire et du silence

On perd: La possibilité de brancher un écran sur la carte vga et un clavier ps/2 pour accéder à un prompt. Pensez à configurer openssh avant.

Les logiciels

lighttpd pour le web, vsftpd pour le ftp et openssh. On évite Apache et proftpd qui sont beaucoup trop gros sans apporter grand chose d'utile.

La gestion des pages est faite à l'aide de scripts perl mais sans base de données SQL. J'utilise des fichiers et des dossiers, les utilisateurs UNIX et les dates de modifications. Ça allège beaucoup le serveur et ça ne limite pas forcément les possibilités.

On gagne: De la mémoire et de la réactivité, et de la sécurité (pas d'injections SQL)

On perd: Le confort de php/MySQL, un peu de souplesse

Trucs qui restent à faire

  • Recompiler le noyau en enlevant tous les trucs inutiles devrait permettre d'alléger encore le système.
  • Configurer lighttpd pour utiliser perl en fastcgi pour gagner encore en vitesse de réponse.
  • Mettre en place une authentification http utilisant directement les utilisateurs unix pour éviter d'avoir à gérer deux listes de logins.